 Tweet
Tweet
Administrators commonly use SSH to access and operate remote servers and devices, including a Docker container. When you connect to any device using SSH, you can run commands, access its files, and perform multiple other tasks. You can also use the Docker container as a hypervisor image that can run applications. For example, a software developer can create a Docker container image to package the software.
Hence, a Docker container image package software with all the dependencies and libraries required. You can remotely develop an application or run a virtual Linux machine by accessing a Docker container with SSH. So, in this guide, we will explain how to create SSH in a Docker container.
How to SSH Into Docker Container
Before we start, you must go here and create a Docker container and configure it with password authentication. So run the following command to create a Docker file:
touch dockerfile
Now, run the nano editor and enter the following details to set the Docker container:
FROM ubuntu:22.04
RUN apt-get update && apt-get install -y openssh-server
RUN mkdir /var/run/sshd
RUN echo 'root:12345' | chpasswd
RUN sed -i 's/#PermitRootLogin prohibit-password/PermitRootLogin yes/' /etc/ssh/sshd_config
EXPOSE 22
CMD ["/usr/sbin/sshd", "-D"]
ENTRYPOINT service ssh start && bash
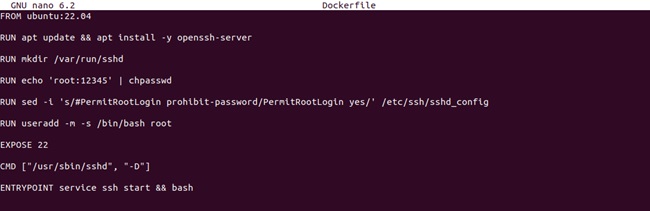
In the above details, please change “root” with the username and 12345 with the password. After saving the file run the following command to create the Docker image your container:
docker build -t my_ssh .

You now have the Docker container ready, so please start it through the following command:
docker run -d --name container_name container_image
Please replace container_name and container_image with the respective name and image of your Docker. Next, you will require the IP address of this Docker container to be used as an argument in the SSH command. Get it by running the below docker inspect command:
docker inspect -f '{{range .NetworkSettings.Networks}}{{.IPAddress}}{{end}}' container_name
In the above command, you need not change anything other than the container_name, which must be your Docker’s name. When running, this will display the IP address of your Docker container, which you must copy and use in the SSH command.
You must install and enable the SSH utility in this Docker container to connect to it via SSH. For instance, in the case of an Ubuntu-based Docker container, you can do it by running:
sudo apt update
sudo apt install openssh-server -y
sudo systemctl enable openssh-server
Finally, generate an SSH key with ssh-keygen (if you do not already have one), copy this key’s path, and use the ssh command to SSH into Docker.
sudo ssh -i /path/to/SSH_key remote_user@docker_IP
Here, the ‘-i’ option lets you specify the path of your key file. You must replace /path/to/SSH_key with the path of the generated key, remote_user with your username at Docker, and docker_IP with the IP address you fetched in the earlier steps.
The above command will successfully establish the SSH connection to your specified Docker container when run. You can now interact with its system using the shell.
A Quick Overview
Docker containers are an excellent asset for teams developing various applications. This tutorial consists of a step-by-step demonstration of SSH in a Docker container. You can use the above method to become skilled enough to operate and interact with Docker remotely. Moreover, we recommend changing the SSH key’s file permissions to keep Docker safe from any unintended third-party interference.
More...