Announcement

Collapse
No announcement yet.

How to Install AWS CLI on Ubuntu 24.04

Collapse
X
Collapse
  •  

  • How to Install AWS CLI on Ubuntu 24.04


    AWS offers numerous services for anyone to use. However, when you want an easy and controlled way of controlling all your AWS services, you must install an AWS CLI (command-line interface). The AWS CLI gives you access to the AWS API, allowing you to manage all the services depending on the task you are handling or want to automate.

    You can install the AWS CLI on Ubuntu 24.04, and there are two approaches you can use depending on your preference. You can install it as a snap package or a Python module inside a Python virtual environment. Let’s discuss each option.

    Method 1: Install AWS CLI Via Snap

    Ubuntu supports AWS CLI, and you can access it as a snap package from App Center via GUI or using the snap command. Installing AWS CLI as a snap will install all the dependency packages it requires without installing them separately.

    If you find this approach convenient, execute the below command to install AWS CLI.

    $ sudo snap install aws-cli --classic


    AWS CLI will be downloaded and installed on your system. With this option, the AWS CLI is accessible system-wide and not just in a virtual environment, as in the second method.

    Once you install AWS CLI, check the installed version to ascertain the package has been installed successfully.

    $ aws --version


    We’ve installed AWS CLI version 2.15.38.

    The next step is to set up the AWS CLI by connecting it with your AWS account to allow you to take control of your AWS services. Run the configure command below.

    $ aws configure


    Provide your credentials to complete the setup.

    Method 2: Install AWS CLI as a Python Module

    You can also install AWS CLI on Ubuntu 24.04 as a Python module. This method requires creating a virtual environment and using pip to install AWS CLI. A virtual environment is a secluded way of using packages. Instead of making AWS CLI accessible system-wide, you can limit it to only being accessible inside the created virtual environment.

    Besides, if you don’t have sudo privileges on the system, provided you have a virtual environment, you will manage to install AWS CLI. Follow the steps below.

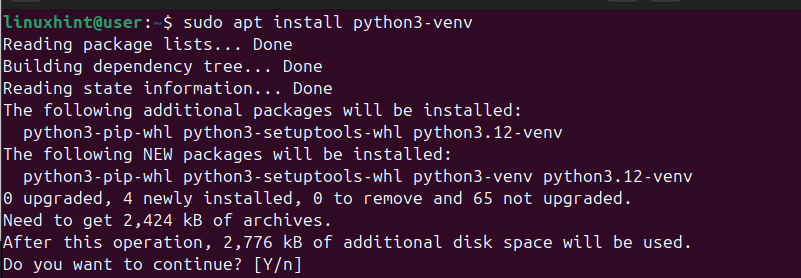
    Step 1: Install Python3 PIP and Venv

    To create a virtual environment, we must have Venv installed. Execute the below command to install it.

    $ sudo apt install Python3-venv


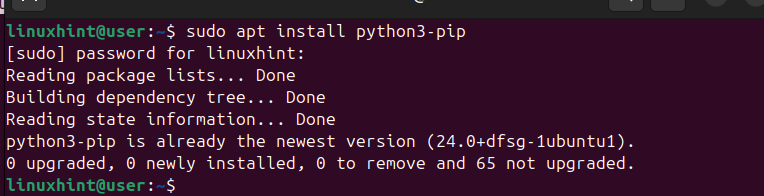
    You also need PIP to help with installing Python modules. Therefore, install PIP using the following command.

    $ sudo apt install python3-pip


    Step 2: Create a Virtual Environment

    With Venv, we can create a secluded environment in which to install AWS CLI without requiring sudo privileges. A virtual environment is recommended when working with Python modules, as it doesn’t interfere with APT-installed packages. Besides, if things go sideways, it doesn’t affect your system. We are using Python 3 for this case.

    Here’s how you create a virtual environment and activate it.

    $ python3 -m venv .venv

    $ source .venv/bin/activate


    We’ve named the virtual environment “venv,” but you can use any preferred name. Again, we’ve created the directory in our current location, but you can specify a different path.

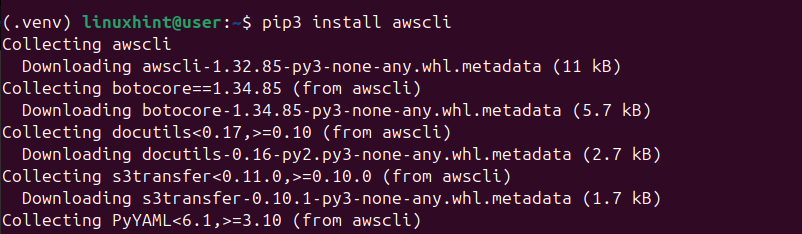
    Step 3: Install AWS CLI

    Inside the virtual environment, running the following command will download and install AWS CLI.

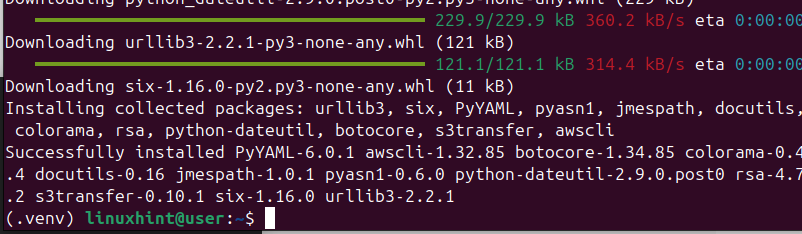
    $ pip3 install awscli


    Ensure the download completes successfully. You will get an output similar to the one below.


    You can check the installed version.

    $ aws --version


    With AWS CLI installed, configure it to start managing your AWS services. Once you are done using it or want to exit the virtual environment, deactivate it.


    Conclusion

    AWS CLI is a preferred way of managing your AWS services. On Ubuntu 24.04, you can install it as a snap package or in a Python virtual environment using PIP. This post discussed each method, giving examples to create a detailed and straightforward guide for anyone to follow along.


    More...
      Posting comments is disabled.

    Categories

    Collapse

    Article Tags

    Collapse

    There are no tags yet.

    Latest Articles

    Collapse

    • Dd Command Examples on Linux
      by Kasimba
      The dd command, or data duplicator, is a robust and versatile utility famous for its disk manipulation features. While its primary purpose is to create disk images, it also lets you clone data, convert file formats, take backups, and more.
      Whether you’re a Linux beginner or an experienced user, understanding the various applications of the dd command can be beneficial. In this short tutorial, we’ll explore multiple examples of the dd command in Linux you can learn with no hassles.
      Create

      ...
      Yesterday, 05:48 PM
    • How To Restart SSH Service in Linux
      by Kasimba
      The Secure Socket Shell, or SSH, is a widely used utility for controlling servers remotely. It can also be used to operate, monitor, and manage remote machines. SSH uses the cryptographic protocol to establish connections, ensuring safety and privacy.
      Although the SSH service becomes active right after installation, you may need to restart it for reasons like configuration changes, system troubleshooting, software updates, etc. This quick tutorial will explain how to easily restart the SSH...
      Yesterday, 05:48 PM
    • How to Log Out of SSH
      by Kasimba
      Secure Shell utility connects to remote devices and servers, allowing you to operate and monitor them efficiently. It establishes the connection through a cryptographic protocol, ensuring a safe and secure environment.


      In addition to administration, you can also use it to transfer files, troubleshoot network issues, etc. Although it is easy to log in and use SSH, many still need to learn how to log out of it. This is the most basic yet crucial aspect you should...
      Yesterday, 05:48 PM
    • How to Use SSH to Access a Remote Server in Linux
      by Kasimba
      Secure Socket Shell (SSH) is a robust tool for accessing remote machines and servers. It establishes the connection via a cryptographic protocol, ensuring utmost privacy and security.

      You can use SSH to transfer files, execute commands, remotely administer the system, troubleshoot underlying issues, and more. This tutorial is for you if you also want to learn how to use SSH to access the remote server. Here, we have listed the methods of SSH to access the remote server in Linux....
      Yesterday, 05:48 PM
    • How to Setup and Use Sshfs in Linux
      by Kasimba
      The SSH File System, or SSHFS, is a filesystem client that you can mount on your local device to interact with files on the remote device. SSH establishes this connection using the Secure Shell File Transfer Protocol (SFTP).
      Moreover, using its cryptographic protocol, SSH ensures data integrity and confidentiality. If your daily tasks include administrating a remote device or server, you are bound to use SSHFS. Hence, you need to learn how to use the SSH File System. So, this short guide will...
      Yesterday, 05:48 PM
    • How To Add SSH Key to GitHub
      by Kasimba
      GitHub is a famous platform for developers to create, store, share, and manage program codes. Here, you can control an application’s versions, host repositories, collaborate and socialize with other users, and many more.
      GitHub has a fantastic feature lets you access and manage your repositories through SSH. However, this connection requires an access key known as an SSH key on your Linux. So, in this article, we will explain how to add an SSH key to GitHub without hassles.
      How To Add

      ...
      Yesterday, 05:48 PM
    Working...
    X